


 2 votes
Reviving A -99 Tdm 850
Started by
anda3243
, May 10 2011 10:28 pm
154 replies to this topic
#41

dapleb
-
- Root Admin(A)
-

- 18,388 posts
Monkey Boy
- Location:The home of morris dancin
- TDM model: 1990
Posted 27 November 2011 - 12:33 pm
Woulda loved to know what happened ear. Guess oil just have to imagine the most loikely outcome.
"Whats up", "Piston Broke", "Yeah me too...hic"
If you want to mark your location on the Carpe map: http://www.carpe-tdm...opic.php?t=5117
Doin valve clearances? Use dappers valve shim exchange program and the job will be carroty - Free (other than you postin me yer shims) for sporting members.
Active member of TPLQHCSRSFC and TSRMCMAS (even though a year off) and avid fan of PM not sent.
#42
aircooled68
-

- Member
-
- 1,581 posts
RTT11 Wales manager
- Location:merseyside
- TDM model: 1998
Posted 27 November 2011 - 01:55 pm


#43
dandywarhol
-
- Member
-
- 5,324 posts
Carpe Citizen
- Location:Edinburgh, Scotland
- TDM model: 2003


#44
wicklamulla
-

- Supporting Member(thanks)
-
- 12,211 posts
is it Jizzy Rascal time yet.....?
- Location:Parish of Cruwys (pronounced 'Cruise' just loike Tom) Morchard, Mid Devon.
- TDM model: 1999
Posted 27 November 2011 - 07:35 pm
ya i'm interested to know what progress has bin made ?
spyball alarm/immob, bluespot brake calipers and Stainless hoses, Fournales air adjustable shock with Remote Resevoir, forks raised 10mm thru yokes, racetech linear fork springs in 15 wt oil, Kappa wingrack/luggage, heated grips, Kedo handguards, dual heat controller to power heated jacket liner and or pants!!, Stebel 136DB horn, K&N air filter, colour matched Baglux tank cover (magnetic tank bag modified to fit cover), osram +50% headloight bulbs, headlight protector,"NitramSpecial" parking loight, tail light indicators all running on LED's & incorporate "Lite Buddies", MK7 Scottoiler fitted, taller screen, 2-2 stainless steel CCC's, Devil stainless down pipes. MKI Renntec engine crash bars & sump guard.
engine changed july 2007 on a dyno run it made 79.1BHP / Torque 59.9Had a brief flirtation with a 1999 MKIIa but it blew an exaust valve on the M5 so was sold on to be repaired.
I loike tay and hang sangwiches !
www.kenhogantreeservices.co.uk
http://s33.photobuck...77/wickla/?sc=6
http://reg.imageshack.us/v_images.php
#45
anda3243
-

- Member
- 89 posts
really likes Carpe
- Location:Stockholm
- TDM model: 1999
Posted 26 December 2011 - 10:58 pm
Sorry to ceep you waiting. I have some free time and will try to catch up with the uppdates during this week.
#46
dapleb
-
- Root Admin(A)
-
- 18,388 posts
Monkey Boy
- Location:The home of morris dancin
- TDM model: 1990
Posted 26 December 2011 - 11:54 pm
Excellent. Glad you are still planning on going ahead with it. 
"Whats up", "Piston Broke", "Yeah me too...hic"
If you want to mark your location on the Carpe map: http://www.carpe-tdm...opic.php?t=5117
Doin valve clearances? Use dappers valve shim exchange program and the job will be carroty - Free (other than you postin me yer shims) for sporting members.
Active member of TPLQHCSRSFC and TSRMCMAS (even though a year off) and avid fan of PM not sent.
If you want to mark your location on the Carpe map: http://www.carpe-tdm...opic.php?t=5117
Doin valve clearances? Use dappers valve shim exchange program and the job will be carroty - Free (other than you postin me yer shims) for sporting members.
Active member of TPLQHCSRSFC and TSRMCMAS (even though a year off) and avid fan of PM not sent.
#47
anda3243
-
- Member
- 89 posts
really likes Carpe
- Location:Stockholm
- TDM model: 1999
Posted 27 December 2011 - 03:49 pm
So now i had an engine i could use. There were still some questions about the wiereing.
I am trying to fit the new motor in the frame.
First change the botom motor bracket. The TDM900 aluminum bracket on the photo. The TDM 850 steel bracket fits right on. It is a good idea to fit the starter motor to the engine while it is still loose.

First get the bottom engine mount bolt in place. Then jack the motor up till the top/rear engine bolt can be put trough. My frame was a little to narrow for the new engine at the top/rear engine mount. There are two bushings welded to the frame, the engine slides in between them, and then the bolt is passing trough the frame, bushings and the engine. The bushings on eather side of the frame were about 1 mm to tight together. I grinded them down so the engine coulod be fitted.
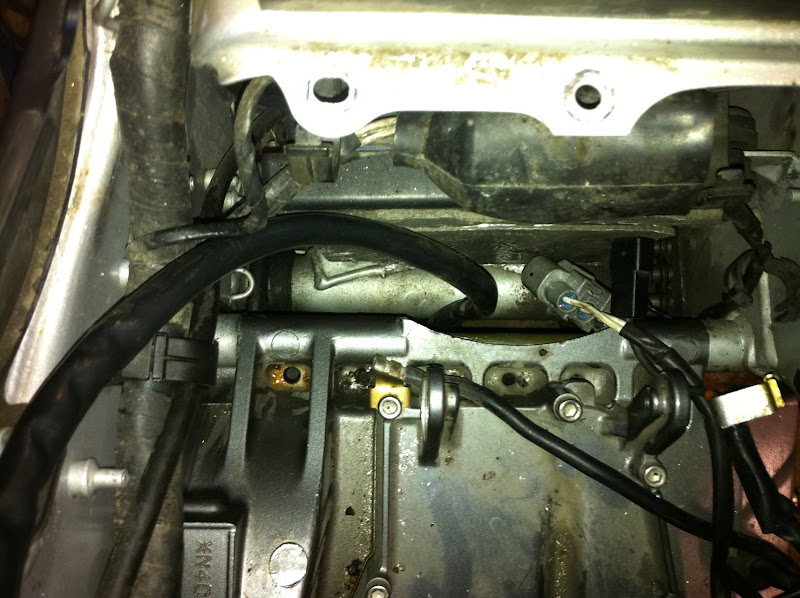
It loks doable. The right hand upper engine bracket does not fit. There is a casting of the cylinder block that is not used. But not in the same place as on the 850 engine. It is easier to make a new bracket than modify the old one.

The left hand will not fit either. There are no moutning points on the castings.

The aligning of the chain was one of the problems i know of. The 900 engine has 6 gears it is a little wider, and the front sprocket is moved further out.
I shortened the outgoing shaft. In the 900 it is used for speedometer, and i will not be using it.

The chain could be fitted. And it seemed like the chain could be aligned.

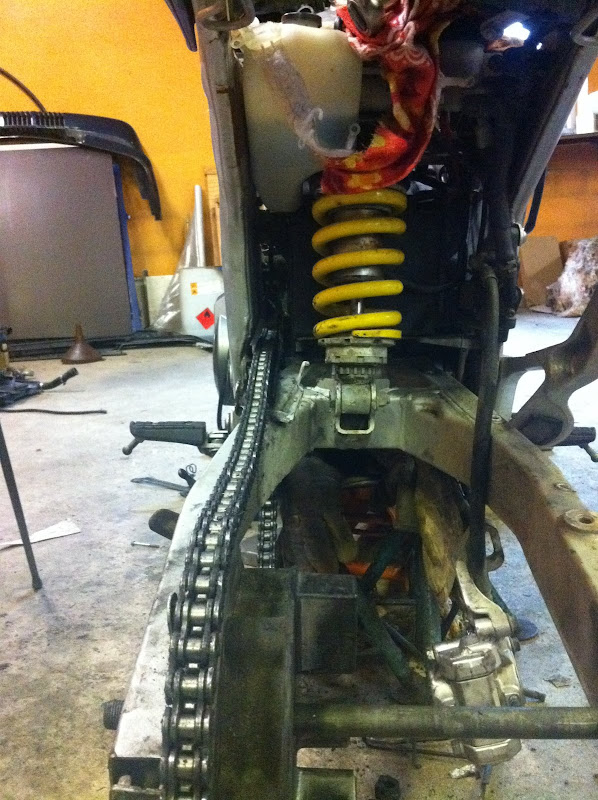
The C-C distance for the carbs seems to be the same. This makes it much easier.

The oil fil tube could be fitted.

The oil tank from 900 seemed to fit.

I am trying to fit the new motor in the frame.
First change the botom motor bracket. The TDM900 aluminum bracket on the photo. The TDM 850 steel bracket fits right on. It is a good idea to fit the starter motor to the engine while it is still loose.
First get the bottom engine mount bolt in place. Then jack the motor up till the top/rear engine bolt can be put trough. My frame was a little to narrow for the new engine at the top/rear engine mount. There are two bushings welded to the frame, the engine slides in between them, and then the bolt is passing trough the frame, bushings and the engine. The bushings on eather side of the frame were about 1 mm to tight together. I grinded them down so the engine coulod be fitted.
It loks doable. The right hand upper engine bracket does not fit. There is a casting of the cylinder block that is not used. But not in the same place as on the 850 engine. It is easier to make a new bracket than modify the old one.
The left hand will not fit either. There are no moutning points on the castings.
The aligning of the chain was one of the problems i know of. The 900 engine has 6 gears it is a little wider, and the front sprocket is moved further out.
I shortened the outgoing shaft. In the 900 it is used for speedometer, and i will not be using it.
The chain could be fitted. And it seemed like the chain could be aligned.
The C-C distance for the carbs seems to be the same. This makes it much easier.
The oil fil tube could be fitted.
The oil tank from 900 seemed to fit.
#48
dapleb
-
- Root Admin(A)
-
- 18,388 posts
Monkey Boy
- Location:The home of morris dancin
- TDM model: 1990
Posted 27 December 2011 - 04:06 pm
Allorra work to do their. Very interesting to see what does and doesn't fit directly.
Not familiar with 9'er output shaft but is that the thread what holds the front sprock nut on that you have cut off?
Not familiar with 9'er output shaft but is that the thread what holds the front sprock nut on that you have cut off?
"Whats up", "Piston Broke", "Yeah me too...hic"
If you want to mark your location on the Carpe map: http://www.carpe-tdm...opic.php?t=5117
Doin valve clearances? Use dappers valve shim exchange program and the job will be carroty - Free (other than you postin me yer shims) for sporting members.
Active member of TPLQHCSRSFC and TSRMCMAS (even though a year off) and avid fan of PM not sent.
If you want to mark your location on the Carpe map: http://www.carpe-tdm...opic.php?t=5117
Doin valve clearances? Use dappers valve shim exchange program and the job will be carroty - Free (other than you postin me yer shims) for sporting members.
Active member of TPLQHCSRSFC and TSRMCMAS (even though a year off) and avid fan of PM not sent.
#49
Matlock
-
- Member
-
- 3,913 posts
Carpe Citizen
- Location:Liverpool
- TDM model: no more
Posted 27 December 2011 - 04:54 pm
QUOTE(dapleb @ Tue 27th Dec 2011, 04:06 PM) <{POST_SNAPBACK}>
Not familiar with 9'er output shaft but is that the thread what holds the front sprock nut on that you have cut off?
No, I seem to recall that there's just a smaller nut that holds on the speedo sensor that goes on the bit that got chopped orf.

2002 TDM900 in glorious yellow, NOW SOLD 
2012 Honda Crosstourer VFR1200X. Hyperspeed tourer.
1990 XTZ750 in black, standard apart from Micron silencer. Mechanical restoration complete, cosmetic restoration next on the agenda.. NOW SOLD
Follow me on twitter
#50
3vd
-

- Member
-
- 2,665 posts
PM Sent
- TDM model: no more
Posted 27 December 2011 - 05:58 pm
Nice work, keep them coming
#51
Studley Ramrod
-
- Root Admin(A)
-
- 19,368 posts
Monkey Boys Monkey
- Location:HELLO ! I'm in the Library...Notts
- TDM model: 1993
Posted 27 December 2011 - 06:01 pm
Thanks for the update and photos
Very interesting.
Mk2a 2000 in Silver. Top end Refurb @ 41100 miles, Scottoiler, Renthal Road High Bars, Up & Back Bar Risers, Bellypan, DL650 Handguards, Capt. Picard Bar Ends, House of Henty SS Wheel spacers, New Seat Cover Fitted. 58 MPG !! Now owned by chrisbee ! Studley's mk2a Bloggerydoodaah ! Photos of my first MK1 Photos of my MK2a TPLQHCSRSFC No. 1 Fan
#52
TYREDNGRUMPEE
-

- Member
-
- 1,627 posts
has been here 4ever
- TDM model: 1998
Posted 27 December 2011 - 06:34 pm
QUOTE(dapleb @ Tue 27th Dec 2011, 04:06 PM) <{POST_SNAPBACK}>
Allorra work to do their. Very interesting to see what does and doesn't fit directly.
Not familiar with 9'er output shaft but is that the thread what holds the front sprock nut on that you have cut off?
Not familiar with 9'er output shaft but is that the thread what holds the front sprock nut on that you have cut off?
So how does that work cos I dunno

#53
wicklamulla
-
- Supporting Member(thanks)
-
- 12,211 posts
is it Jizzy Rascal time yet.....?
- Location:Parish of Cruwys (pronounced 'Cruise' just loike Tom) Morchard, Mid Devon.
- TDM model: 1999
Posted 27 December 2011 - 07:37 pm
QUOTE(dapleb @ Tue 27th Dec 2011, 04:06 PM) <{POST_SNAPBACK}>
Allorra work to do their. Very interesting to see what does and doesn't fit directly.
Not familiar with 9'er output shaft but is that the thread what holds the front sprock nut on that you have cut off?
Not familiar with 9'er output shaft but is that the thread what holds the front sprock nut on that you have cut off?
I tink the front sprocket retaining threads are behind the cutting disc in the piccy above, so no worries as the bit he's grinding off isn't needed. Lookin' @ that angle grinder makes me tink Anda an i are long lost brudders

be interesting to see how the carbs and electrics/cdi work out. I'm loving this thread.
Edited by wicklamulla, 27 December 2011 - 07:37 pm.
spyball alarm/immob, bluespot brake calipers and Stainless hoses, Fournales air adjustable shock with Remote Resevoir, forks raised 10mm thru yokes, racetech linear fork springs in 15 wt oil, Kappa wingrack/luggage, heated grips, Kedo handguards, dual heat controller to power heated jacket liner and or pants!!, Stebel 136DB horn, K&N air filter, colour matched Baglux tank cover (magnetic tank bag modified to fit cover), osram +50% headloight bulbs, headlight protector,"NitramSpecial" parking loight, tail light indicators all running on LED's & incorporate "Lite Buddies", MK7 Scottoiler fitted, taller screen, 2-2 stainless steel CCC's, Devil stainless down pipes. MKI Renntec engine crash bars & sump guard.
engine changed july 2007 on a dyno run it made 79.1BHP / Torque 59.9Had a brief flirtation with a 1999 MKIIa but it blew an exaust valve on the M5 so was sold on to be repaired.
I loike tay and hang sangwiches !
www.kenhogantreeservices.co.uk
http://s33.photobuck...77/wickla/?sc=6
http://reg.imageshack.us/v_images.php
#54
anda3243
-
- Member
- 89 posts
really likes Carpe
- Location:Stockholm
- TDM model: 1999
Posted 29 December 2011 - 11:07 pm
QUOTE(wicklamulla @ Tue 27th Dec 2011, 08:37 PM) <{POST_SNAPBACK}>
I tink the front sprocket retaining threads are behind the cutting disc in the piccy above, so no worries as the bit he's grinding off isn't needed. Lookin' @ that angle grinder makes me tink Anda an i are long lost brudders
be interesting to see how the carbs and electrics/cdi work out. I'm loving this thread.
be interesting to see how the carbs and electrics/cdi work out. I'm loving this thread.
It will not be the last time the angle grinder is used.

Here is how the front sprocket looks when complete. The piece I grinded away is for the speed sensor. The thread for front sprocket is on the other side of the grinding wheel.

#55
dapleb
-
- Root Admin(A)
-
- 18,388 posts
Monkey Boy
- Location:The home of morris dancin
- TDM model: 1990
Posted 29 December 2011 - 11:16 pm
So whats next...left and right brackets?
"Whats up", "Piston Broke", "Yeah me too...hic"
If you want to mark your location on the Carpe map: http://www.carpe-tdm...opic.php?t=5117
Doin valve clearances? Use dappers valve shim exchange program and the job will be carroty - Free (other than you postin me yer shims) for sporting members.
Active member of TPLQHCSRSFC and TSRMCMAS (even though a year off) and avid fan of PM not sent.
If you want to mark your location on the Carpe map: http://www.carpe-tdm...opic.php?t=5117
Doin valve clearances? Use dappers valve shim exchange program and the job will be carroty - Free (other than you postin me yer shims) for sporting members.
Active member of TPLQHCSRSFC and TSRMCMAS (even though a year off) and avid fan of PM not sent.
#56
LewisBlackburn
-
- Member
-
- 1,748 posts
has been here 4ever
- TDM model: no more
Posted 29 December 2011 - 11:34 pm
Looking Darn good 
#57
anda3243
-
- Member
- 89 posts
really likes Carpe
- Location:Stockholm
- TDM model: 1999
Posted 29 December 2011 - 11:55 pm
The new engine brackets
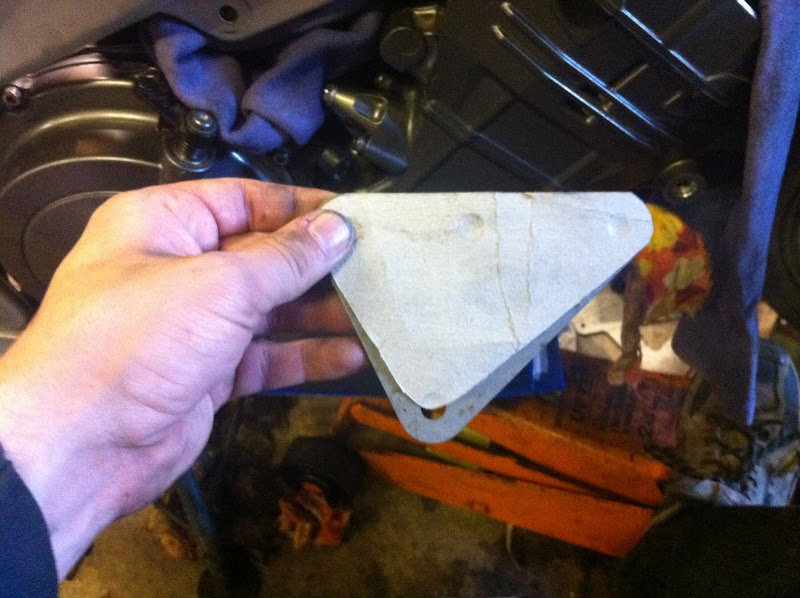
When the engine was in place, templates for the new engine brackets were made. Great care should be taken when making templates. I was a bit careless, which resulted in more work later.
The casting on the 900 engine is prepeared with a mounting "ear", but it is not drilled or threaded.

For the right side bracket i moved one of the mounting points on the frame. I used the same mounting "ear" on the front of the cylinders that is used in the 900. Sorry for the shitty pictures,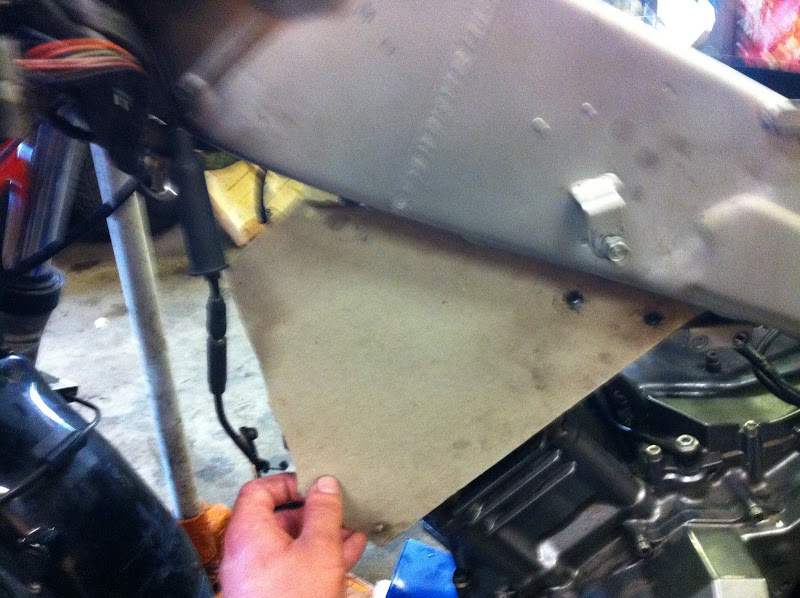
Just pased the point of no return

Inside of the frame
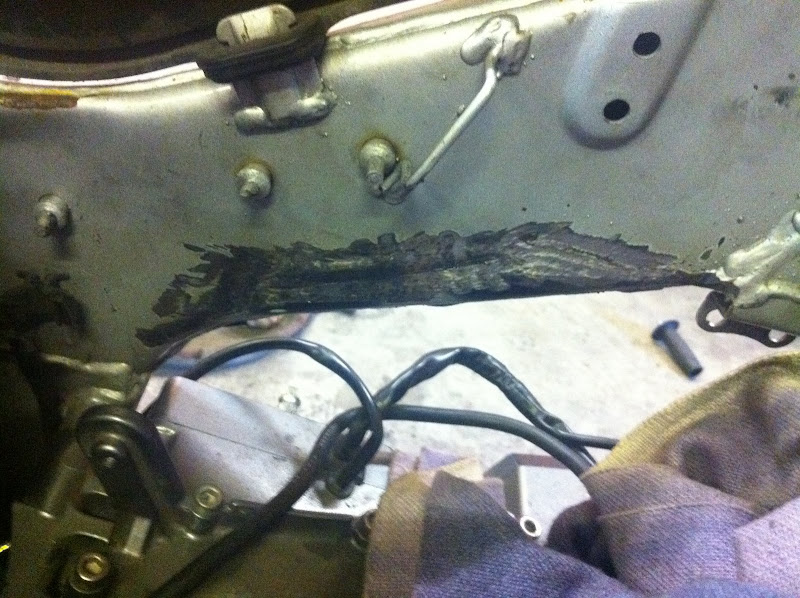
The new location of the mounting. I will later realize that the coolant hose from cylinders to the radiator pases there.

A friend had acces to a water cutting machine and he helped to cut the brackets from 5 mm construction steel. He cut both engine brackets and a 5 mm spacer for the rear wheel.Unfortionaly my templates were not that accurate.


Made a new template
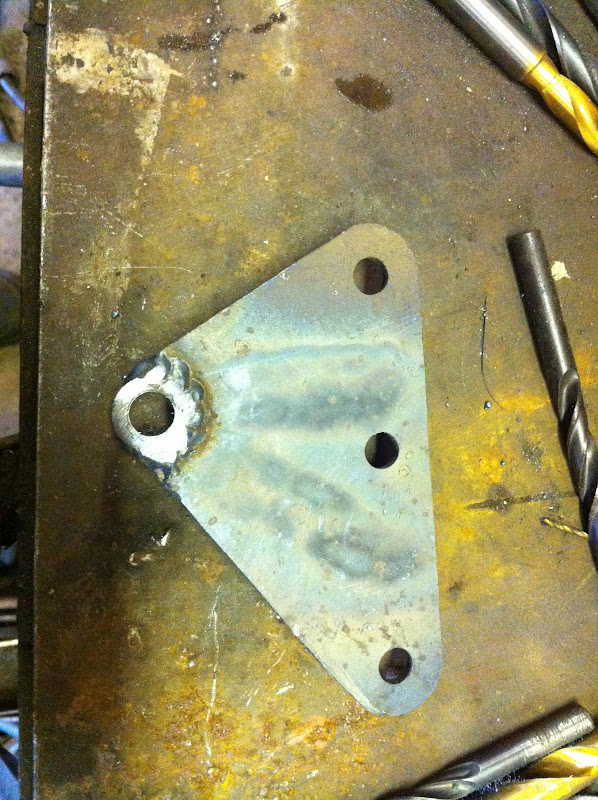
Grinded the bracket to correct shape

Then prepared the engine castingsgrinding the surface of it, drilling a hole, and threading it.

M12 x 1,25 same pitch as on the 850 engine.

Grinded some more on the bracket

I used the bolt from the 850 engine and fastened a bushing. The bracket was grinded until ut fittet with the bushing and the three other holes.

Then weld them together.
You guessed right
When the engine was in place, templates for the new engine brackets were made. Great care should be taken when making templates. I was a bit careless, which resulted in more work later.
The casting on the 900 engine is prepeared with a mounting "ear", but it is not drilled or threaded.
For the right side bracket i moved one of the mounting points on the frame. I used the same mounting "ear" on the front of the cylinders that is used in the 900. Sorry for the shitty pictures,
Just pased the point of no return
Inside of the frame
The new location of the mounting. I will later realize that the coolant hose from cylinders to the radiator pases there.
A friend had acces to a water cutting machine and he helped to cut the brackets from 5 mm construction steel. He cut both engine brackets and a 5 mm spacer for the rear wheel.Unfortionaly my templates were not that accurate.
Made a new template
Grinded the bracket to correct shape
Then prepared the engine castingsgrinding the surface of it, drilling a hole, and threading it.
M12 x 1,25 same pitch as on the 850 engine.
Grinded some more on the bracket
I used the bolt from the 850 engine and fastened a bushing. The bracket was grinded until ut fittet with the bushing and the three other holes.
Then weld them together.
QUOTE(dapleb @ Fri 30th Dec 2011, 12:16 AM) <{POST_SNAPBACK}>
So whats next...left and right brackets?
You guessed right
Edited by anda3243, 29 December 2011 - 11:58 pm.
#58
dapleb
-
- Root Admin(A)
-
- 18,388 posts
Monkey Boy
- Location:The home of morris dancin
- TDM model: 1990
Posted 30 December 2011 - 12:08 am
QUOTE(anda3243 @ Thu 29th Dec 2011, 11:55 PM) <{POST_SNAPBACK}>
Just pased the point of no return
Scarey stuff moving the mounting points, glad it worked out ok.
"Whats up", "Piston Broke", "Yeah me too...hic"
If you want to mark your location on the Carpe map: http://www.carpe-tdm...opic.php?t=5117
Doin valve clearances? Use dappers valve shim exchange program and the job will be carroty - Free (other than you postin me yer shims) for sporting members.
Active member of TPLQHCSRSFC and TSRMCMAS (even though a year off) and avid fan of PM not sent.
If you want to mark your location on the Carpe map: http://www.carpe-tdm...opic.php?t=5117
Doin valve clearances? Use dappers valve shim exchange program and the job will be carroty - Free (other than you postin me yer shims) for sporting members.
Active member of TPLQHCSRSFC and TSRMCMAS (even though a year off) and avid fan of PM not sent.
#59
anda3243
-
- Member
- 89 posts
really likes Carpe
- Location:Stockholm
- TDM model: 1999
Posted 30 December 2011 - 12:27 am
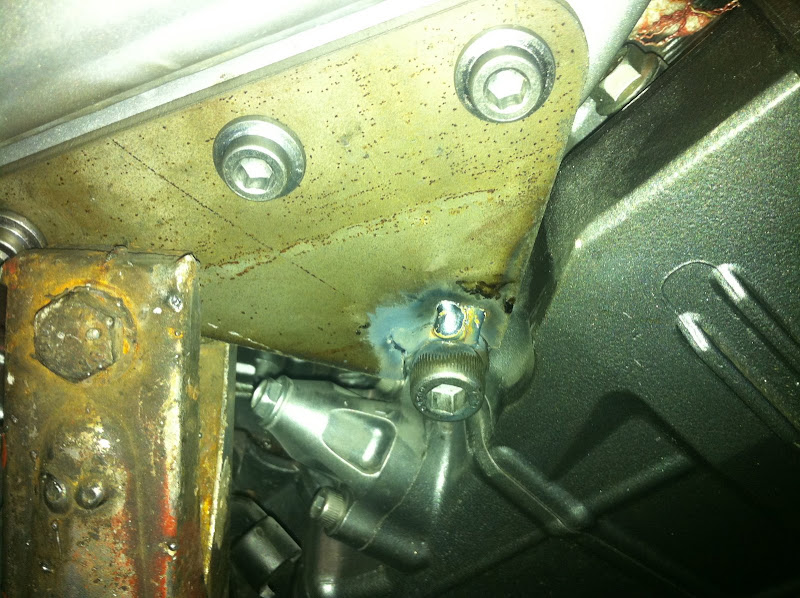
Welded the bushing properly, and welded on some flanges to make it stronger.

The flanges were grinded down somewhat later

The left side bracket
I bought a bolt that fitted. M12 x 1,25
I am in need of a better looking bolt,

The bolt was fittet with a bushing, same as the other side. And the bracket grinded and fitted.

Then welding it to the bushing and fitting the engine mount. The engine is hold in place by the rear mounting points. Note that the bushing takes up some "axial" play. I dont need to bend the bracket to make it fit properly.

Welding the mount to the frame

Adding reinforcement flanges, and welding the bushing properly.


Grinding down the flanges and cleaning both brackets.

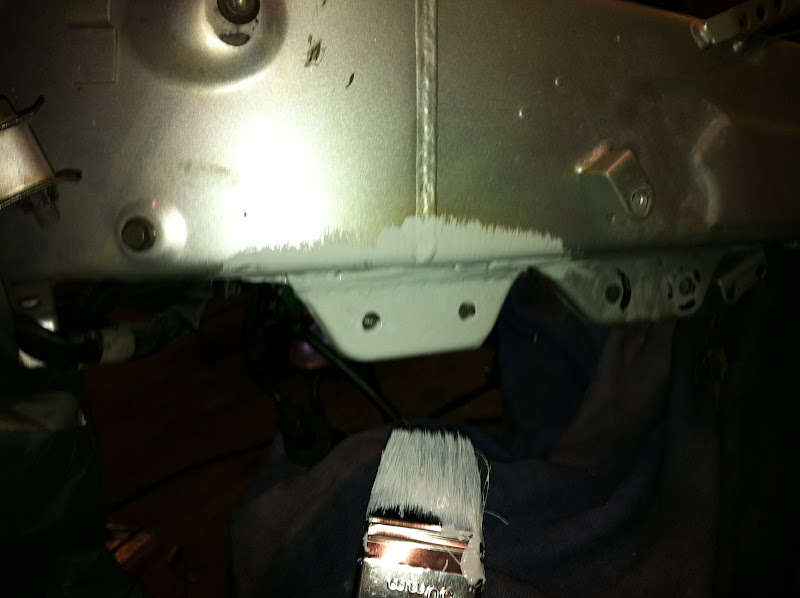
Then painting. First ground, then silver.
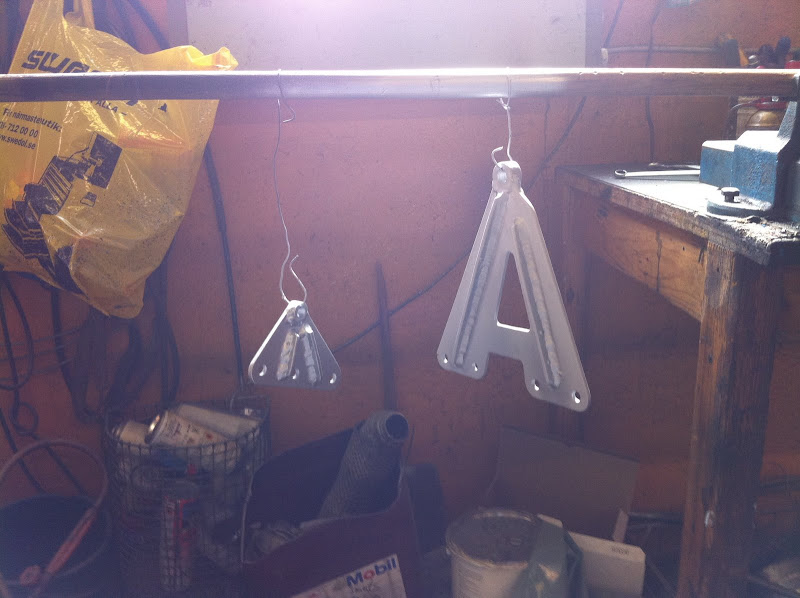
Also ground paint on the welded mount on the frame. This was also spray painted silver later.
The flanges were grinded down somewhat later
The left side bracket
I bought a bolt that fitted. M12 x 1,25
I am in need of a better looking bolt,
The bolt was fittet with a bushing, same as the other side. And the bracket grinded and fitted.
Then welding it to the bushing and fitting the engine mount. The engine is hold in place by the rear mounting points. Note that the bushing takes up some "axial" play. I dont need to bend the bracket to make it fit properly.
Welding the mount to the frame
Adding reinforcement flanges, and welding the bushing properly.
Grinding down the flanges and cleaning both brackets.
Then painting. First ground, then silver.
Also ground paint on the welded mount on the frame. This was also spray painted silver later.
#60
Margus
-

- Member
-
- 133 posts
Carpe Regular
- Location:Estonia
- TDM model: 1991
Posted 30 December 2011 - 08:58 am
Great progress. Reminds me of my last winter project: Fiting a Yamaha SZR 660 engine on a Polaris Explorer 400 ATV, wich turned out extreamely well.
Work on my bike hasn't ended jet!

1 user(s) are reading this topic
0 members, 1 guests, 0 anonymous users

