
very well done, i like it alot.

 2 votes
Reviving A -99 Tdm 850
Started by
anda3243
, May 10 2011 10:28 pm
154 replies to this topic
#121

wicklamulla
-

- Supporting Member(thanks)
-

- 12,211 posts
is it Jizzy Rascal time yet.....?
- Location:Parish of Cruwys (pronounced 'Cruise' just loike Tom) Morchard, Mid Devon.
- TDM model: 1999
Posted 12 November 2012 - 10:44 pm
spyball alarm/immob, bluespot brake calipers and Stainless hoses, Fournales air adjustable shock with Remote Resevoir, forks raised 10mm thru yokes, racetech linear fork springs in 15 wt oil, Kappa wingrack/luggage, heated grips, Kedo handguards, dual heat controller to power heated jacket liner and or pants!!, Stebel 136DB horn, K&N air filter, colour matched Baglux tank cover (magnetic tank bag modified to fit cover), osram +50% headloight bulbs, headlight protector,"NitramSpecial" parking loight, tail light indicators all running on LED's & incorporate "Lite Buddies", MK7 Scottoiler fitted, taller screen, 2-2 stainless steel CCC's, Devil stainless down pipes. MKI Renntec engine crash bars & sump guard.
engine changed july 2007 on a dyno run it made 79.1BHP / Torque 59.9Had a brief flirtation with a 1999 MKIIa but it blew an exaust valve on the M5 so was sold on to be repaired.
I loike tay and hang sangwiches !
www.kenhogantreeservices.co.uk
http://s33.photobuck...77/wickla/?sc=6
http://reg.imageshack.us/v_images.php


#122
anda3243
-

- Member
- 89 posts
really likes Carpe
- Location:Stockholm
- TDM model: 1999
Posted 13 November 2012 - 07:52 pm
very well done, i like it alot.
Thank you

Edited by anda3243, 13 November 2012 - 07:53 pm.
#123
anda3243
-
- Member
- 89 posts
really likes Carpe
- Location:Stockholm
- TDM model: 1999
Posted 13 November 2012 - 11:20 pm
Pre vacation upgrades
There would be a motorcykle vacation. For this the bike must be prepared.
Basic maintenance needed to be done. I also needed panniers. And something needed to be done about the windscreen.
The inital "plan" was to go to Odesa in Ukraine, but this didnt work out as planed. Partly due to bike failure.
The preparations began.
I began with valve clearance check, The previous adjustment was not optimal since I only had shims from my old 850 engine. I first tried to buy just the shims I needed, but ended up with the wrong ones. I bought a complete set of shims from hotcams. It is was so much easier this way.
I checked the spark plugs. They were a little to pale, hmm, seemed ok at the moment.

Then I washed and inspected the air filter. There I discovered that the filter element was too short Air was escaping past the filter in the bottom of the filter.
I fixed that with a sponge.


It turned out ok. At the moment I had no thougts that this could affect the fuel/air ratio....
Next, replace the rubber boots for carburators.

At this point I had figured out that the rear shock absorber could have failed, causing the uneasy feeling when driving.
I replaced it with a new Hagon. The new one was a little longer, making the bike 20 mm (I think) higher at back.
This made the ride much much better. I could now handle corners much better.
Then rebuild the front forks, and se over the front brakes.
My method for removing the seal:


With the front forks rebuild and filled with the right amount of oil the bike was even better to drive.
Attached handguards

The inner bracket:
The piece clamping around the handlebars is a universal rear mirror clamp. The bolt attaching the handguard is made by me.

On the outside i modified the endweight. I cut away much of the weight and made a M8 tread trough the remaining weight. The handguard is attached wit one M8 bolt.
The metal in the weights is realy soft, hard to work with on a lathe. It turned out later that I had removed to much weight, and had to much vibrations in the handlebars. I ended up attaching some steel parts again.
I have no pics of this tho.

Next post will be about windscreen and panniers.
There would be a motorcykle vacation. For this the bike must be prepared.
Basic maintenance needed to be done. I also needed panniers. And something needed to be done about the windscreen.
The inital "plan" was to go to Odesa in Ukraine, but this didnt work out as planed. Partly due to bike failure.
The preparations began.
I began with valve clearance check, The previous adjustment was not optimal since I only had shims from my old 850 engine. I first tried to buy just the shims I needed, but ended up with the wrong ones. I bought a complete set of shims from hotcams. It is was so much easier this way.
I checked the spark plugs. They were a little to pale, hmm, seemed ok at the moment.
Then I washed and inspected the air filter. There I discovered that the filter element was too short
Air was escaping past the filter in the bottom of the filter.I fixed that with a sponge.
It turned out ok. At the moment I had no thougts that this could affect the fuel/air ratio....
Next, replace the rubber boots for carburators.
At this point I had figured out that the rear shock absorber could have failed, causing the uneasy feeling when driving.
I replaced it with a new Hagon. The new one was a little longer, making the bike 20 mm (I think) higher at back.
This made the ride much much better. I could now handle corners much better.
Then rebuild the front forks, and se over the front brakes.
My method for removing the seal:
With the front forks rebuild and filled with the right amount of oil the bike was even better to drive.
Attached handguards
The inner bracket:
The piece clamping around the handlebars is a universal rear mirror clamp. The bolt attaching the handguard is made by me.
On the outside i modified the endweight. I cut away much of the weight and made a M8 tread trough the remaining weight. The handguard is attached wit one M8 bolt.
The metal in the weights is realy soft, hard to work with on a lathe. It turned out later that I had removed to much weight, and had to much vibrations in the handlebars. I ended up attaching some steel parts again.
I have no pics of this tho.
Next post will be about windscreen and panniers.
#124
tdm850rider
-

- Member
-
- 6,103 posts
Carpe Citizen
- Location:Pittsburgh, Pennsylvania USA
- TDM model: 1992
Posted 14 November 2012 - 02:02 am
cool!

Always tell the truth, it will gratify some of the people and astonish the rest. (Mark Twain)
£
Stebel Nautilus air-horn, Corbin seat, MRA Touring screen, single Delkevic silencer.
"I see by your outfit that you are a spaceman"(MkI (3VD) TDM Review)
Hints for using Carpe-TDM. (photo's, links, etc).
#125
3vd
-

- Member
-
- 2,665 posts
PM Sent
- TDM model: no more
Posted 14 November 2012 - 06:30 am
Credit to you Anda, great to see your write up active again
#126
anda3243
-
- Member
- 89 posts
really likes Carpe
- Location:Stockholm
- TDM model: 1999
Posted 16 November 2012 - 09:43 pm
Credit to you Anda, great to see your write up active again
Thank you.
The writing seems to go in periods
#127
anda3243
-
- Member
- 89 posts
really likes Carpe
- Location:Stockholm
- TDM model: 1999
Posted 16 November 2012 - 10:39 pm
The windscreen
As I was riding, I did some experimenting, putting my hand up making the screen taller. It seemed as if the screen was 5 to 10 cm higher it would become much more effective.
I was thinking about buying a different screen, but it was quite expensive, and how well a different screen would perform was not known.
I went wit the idea of fitting an adjustable wind deflector. (as on many MRA screens).
I purchased 2 MRA sparepart "hinges". And a piece of lexan
I was told by the glazier guy that lexan was the way to go for a windscreen, much better than the plexiglass. It could also be bended without warming, he told.
The lexan cost me about 2 eur.
The sheat begining to take shape

The shape is about right,
These are the hinges I will be using.

The bending of the lexan sheet was very difficult. I could bend it so the shorter edges touch each other, but the sheet regained it original flat shape. After much shaping aginst a 40 mm steel tube I got the curvature. Some careful measuring and drilling and it could be attached to the original windscreen.
Downside was that the lexan became a bit "milky" because of the bending. When flat you it was fully transparent. I wonder if it would have been better to form it with a heat gun.

For my lenght and riding position this works ok up to 90 km/h, with higher speeds it more windy but still better that without.
The total cost for this mod was under 30 EUR. The result was not as pretty as a new purchased part would be. But it does its job, and unless you examine it in detail, you cannot tell its homemade.
And some action pics of the finnished result.


As I was riding, I did some experimenting, putting my hand up making the screen taller. It seemed as if the screen was 5 to 10 cm higher it would become much more effective.
I was thinking about buying a different screen, but it was quite expensive, and how well a different screen would perform was not known.
I went wit the idea of fitting an adjustable wind deflector. (as on many MRA screens).
I purchased 2 MRA sparepart "hinges". And a piece of lexan
I was told by the glazier guy that lexan was the way to go for a windscreen, much better than the plexiglass. It could also be bended without warming, he told.
The lexan cost me about 2 eur.
The sheat begining to take shape
The shape is about right,
These are the hinges I will be using.
The bending of the lexan sheet was very difficult. I could bend it so the shorter edges touch each other, but the sheet regained it original flat shape. After much shaping aginst a 40 mm steel tube I got the curvature. Some careful measuring and drilling and it could be attached to the original windscreen.
Downside was that the lexan became a bit "milky" because of the bending. When flat you it was fully transparent. I wonder if it would have been better to form it with a heat gun.
For my lenght and riding position this works ok up to 90 km/h, with higher speeds it more windy but still better that without.
The total cost for this mod was under 30 EUR. The result was not as pretty as a new purchased part would be. But it does its job, and unless you examine it in detail, you cannot tell its homemade.
And some action pics of the finnished result.
#128
jono49
-

- Member
-
- 1,183 posts
has been here 4ever
- Location:The Debatable Land
- TDM model: 2003
Posted 17 November 2012 - 12:35 am
Just tried to purchase the hinges direct from MRA and Can't! because we have an importer in the UK namely HPS and I'm buggered if i can see the hinges on their site?..... Anybody purchased these in the UK from HPS???????????
Don't get confused between my personality
and my attitude. My personality is who I am,
my attitude depends on who YOU are!
Skinny people are easy to kidnap.....Stay safe and eat cake!!!!!
#129
anda3243
-
- Member
- 89 posts
really likes Carpe
- Location:Stockholm
- TDM model: 1999
Posted 17 November 2012 - 07:52 am
Just tried to purchase the hinges direct from MRA and Can't! because we have an importer in the UK namely HPS and I'm buggered if i can see the hinges on their site?..... Anybody purchased these in the UK from HPS???????????
I bought mine here
http://www.ebay.co.u...=item27ccd342d3
#130
jono49
-
- Member
-
- 1,183 posts
has been here 4ever
- Location:The Debatable Land
- TDM model: 2003
Posted 17 November 2012 - 09:58 am
 Thanks for that Anda, And thank you for a brilliant write up as well!!!!!!
Edited by jono49, 17 November 2012 - 10:00 am.
Don't get confused between my personality
and my attitude. My personality is who I am,
my attitude depends on who YOU are!
Skinny people are easy to kidnap.....Stay safe and eat cake!!!!!
#131
anda3243
-
- Member
- 89 posts
really likes Carpe
- Location:Stockholm
- TDM model: 1999
Posted 21 November 2012 - 09:46 pm
The panniers
I did some searching for different off the shelf panniers. I didnt find anything that I liked.
I wanted panniers that are opened from the top, so your stuff does not fall out when you open them. I would also preferred aluminium as It looks better.
Most of what I found was in plastic and opened in the "wrong" way. Some were for the 900 bike only. Some were very expensive. Some were very ugly.
After some time I started to look for aluminium boxes, ex military equipment boxes...
After some time I found a small company making what I wanted,
A simple aluminium box with a lid. The box has a lid on hinges and small latches that can be locked with a small padlock. Each box is 33 litres.
These were actually custom made as I wanted 33 not 40 or 45 litre boxes.
For attaching them I bought a used set of givi racks. Can seen in background on the first pic.


It took some time to make the givi racks to sit straight. Then there were some manufacturing, welding and grinding. No pics of that. The idea was to bolt the panniers to the racks with 5 pc M8 bolts and big washers/brackets from inside that spreads out the load.
Here I am cutting out a piece of rubber that will lay inbetween the pannier and the rack. Racks are modified and painted.

Then I attached a cut up sleeping mat as lining. The mat is attached with double sided tape. The lining will prevent my stuff from rattling around too much and rubbing to the aluminium.

The finished result:
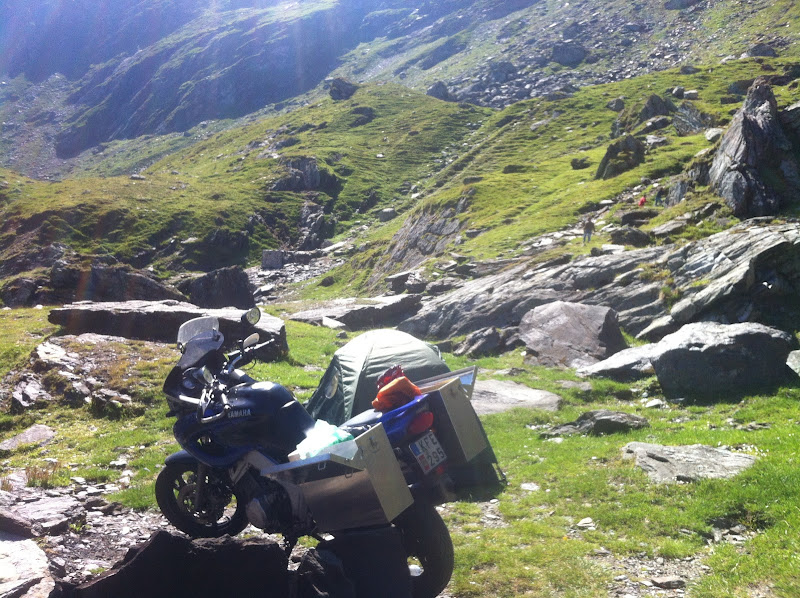

The opened lids work as temporary storage when packing and unpacking from the panniers.
But I will need to reinforce the givi racks and attachments of the panniers to the racks. The boxes started to deform after some time.
I did some searching for different off the shelf panniers. I didnt find anything that I liked.
I wanted panniers that are opened from the top, so your stuff does not fall out when you open them. I would also preferred aluminium as It looks better.
Most of what I found was in plastic and opened in the "wrong" way. Some were for the 900 bike only. Some were very expensive. Some were very ugly.
After some time I started to look for aluminium boxes, ex military equipment boxes...
After some time I found a small company making what I wanted,
A simple aluminium box with a lid. The box has a lid on hinges and small latches that can be locked with a small padlock. Each box is 33 litres.
These were actually custom made as I wanted 33 not 40 or 45 litre boxes.
For attaching them I bought a used set of givi racks. Can seen in background on the first pic.
It took some time to make the givi racks to sit straight. Then there were some manufacturing, welding and grinding. No pics of that. The idea was to bolt the panniers to the racks with 5 pc M8 bolts and big washers/brackets from inside that spreads out the load.
Here I am cutting out a piece of rubber that will lay inbetween the pannier and the rack. Racks are modified and painted.
Then I attached a cut up sleeping mat as lining. The mat is attached with double sided tape. The lining will prevent my stuff from rattling around too much and rubbing to the aluminium.
The finished result:
The opened lids work as temporary storage when packing and unpacking from the panniers.
But I will need to reinforce the givi racks and attachments of the panniers to the racks. The boxes started to deform after some time.
#132
jono49
-
- Member
-
- 1,183 posts
has been here 4ever
- Location:The Debatable Land
- TDM model: 2003
Posted 21 November 2012 - 11:40 pm
Nice set up Anda, Nice and light and not to big!.......Give us a hint of how much the boxes cost?????
Don't get confused between my personality
and my attitude. My personality is who I am,
my attitude depends on who YOU are!
Skinny people are easy to kidnap.....Stay safe and eat cake!!!!!
#133
ramo
-

- Member
-
- 1,189 posts
has been here 4ever
- Location:Nottm
- TDM model: 2003
Posted 21 November 2012 - 11:48 pm
Anda they look the biz,
ditto above, any link, approx cost?
ditto above, any link, approx cost?
#134
anda3243
-
- Member
- 89 posts
really likes Carpe
- Location:Stockholm
- TDM model: 1999
Posted 22 November 2012 - 11:26 am
The cost for the panniers including shipping and padlocks was 634 USD. or 500 Eur http://www.coyotetri...e/shop/shop.htm
The used givi racks 70 gbp or 90 EUR
Other bits of pieces, 300 sek or 30 EUR
And some labour
The total for me 620 EUR
It is not the cheapest solution. But I am happy with the result. And I think that its worth the money.
One downside is that the panniers makes the sitting position for passenger uncomfortable, The front inner corners for the panniers will be cutting in the passengers legs. The panniers could be placed further back, but I did not.
#135
anda3243
-
- Member
- 89 posts
really likes Carpe
- Location:Stockholm
- TDM model: 1999
Posted 27 July 2013 - 10:03 pm
So, some time has passed and the bike has now done 70 000 kms, the motor 40 000 kms. I will write what has been done to the bike, and what failures have hapened.
I need an outside view on this.
During the summer of 2012 a trip was undertaken. Prior this trip some uppgrades and service was done. Most of it is writen above.
I cleaned the air filter, and discovered that there is a gap under the filtre element so air can go past the flitre. There are 6 to 7 mm under the filter where air can go past . I fixed this with a sponge under the filter element, so all air must pass trough the filter.
This of course changes the resistance for the airflow, and therefore the fuel/air mixture. 
Here is a picture of air filter on my bike. It is a washable air filter.

The bike run a little differently, but still had power. Over 5500 rpm or full throtle it run a but rough, but i do not use full throttle to often.
I drove with this fix some weeks with no problems, and then headed out on my trip.
Outside Kiev the bike started to have problems, at low rpms only running on one cylinder, and runnig quite rough on higher rpms. It was realy hard to strart. This was a difficult and memorable part in our trip.
When strarting it cold I needed to remove the sparkplugs and clean them, put them back and to try again. And repeat this until the bike started.
I suspected the ignition coils and HT leads, these were checked. Then I suspected the carbs, wich were also checked and ok. Cables and spark plug caps were changed, with no noticable result.
The bike was getting worse and worse, nothing I did gave any effect. Now it would not idle, it could onlu be run if the rpms were over 2500.
The tank, air filter and carbs were taken off several times. I did not know what else to doo. I was getting desperate.
All work on the bike was done outside with the tools we brought with us. Sometimes it was raining.
Eventualy we made it to Slovakia where we knew some people and could get help. Bike was brought to a localy well known bike mechanic. He was a bit of a original. He was a little hesitant on taking this on since the motor was not stock, but if I stayed and could answer questions he had, he would attempt to fix the bike.
So I was sitting on a chair, while he was fixing with the bike.
There compression ratio was measured. 8:1 resp 11,5:1 !!!! WTF, The comnpression ratios was 12:1 on both cylinders when the bike was bought.
Then he declared that the spark plugs are damaged, and must be changed. The spark plugs were the only part that I did not have spare.
Ignition coils, the leads and caps were measured. Those were ok.
At this point we found out that the bike was running much to rich. Wich caused the spark plugs to fail and create carbon depisits inside the combustion chamber. The idea was that the carbo deposits were affecting the function of piston rings and maybe valves, wich loveres the compression ratio.
The reason the fuel mixture was too rich was the restricted air filter. The previous owners must have put this filter in and then changed the jetting to get the bike to run. Must have been way to lean with air bypassing the filter.
To get the compression back he hed a secret solution that should solve the carbon deposits. He did not want to tell what it was, my guess is diesel and fotogen and maybee brake fluid. This solution was poured down the cylinders and left owernight.
New spark plugs were purchased and put in.
Air filter was washed out to give less resistance.
after 20 hours with the secret solution, the compression ratios was 11:1 and 12:1 It worked wonders.  He still did not tell what he was using, trade secret I guess.
And with new spark plugs and the washed air filter the bike much better. It could idle and run much much smother.
After this I borrowed a garage and could perform a valve check. Valves were within spec. So the low compression was probably due to the carbon deposits and not a mechanical failure.
To sumerize this far. The fuel mixture was to rich due to the sponge put in the air filter. The rich mixture made the spark plugs to fail and the carbon deposits to build up. The carbon deposits made the piston rings to fail.
I decided to continue the trip despite this mishap. In Budapest I changed the main jets to size 150, the ones that were fitted were way to big. The stock size is 142 I think. Spare spark plugs were bought. Air filter was oiled up again.
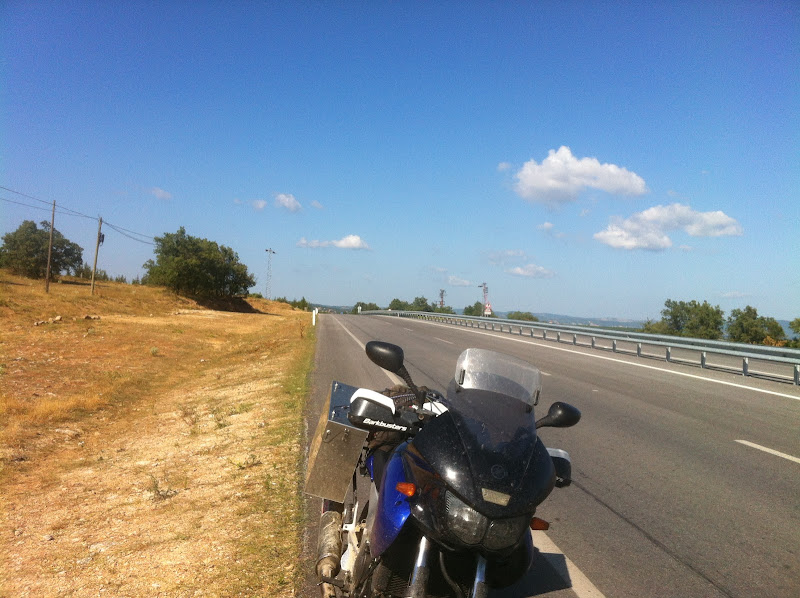
After this the bike run well. I wisited Romania, Bulgaria, Turkey, Greece, Serbija, and back to Sweden. And did some riding in Sweden during the autumn. I had no problems with the bike at all.
This summer a trip to Norway was undertaken. And the bike was again prepeared.
I changed the spark plugs and noticed that they are quite white. The bike is running lean.
I kept the main jets. I liftet the needle up one notch and opened up the air screw 2,75 revolutions from bottom. After this the bike had much more power from 4000 to 5000 rpm-
Valves were checked again and was within spec.
In Norway, after running in rain and slowly driving down a steep descent using motor brake an low revs the bike started to run rough again. The same simptoms as last summer. Running on one cylinder and running a bit rough on higher rpms. This time the bike could idle, but was difficult to rev up.
My idea was that the mixture at low rpms/idle is ti rich wich causes the spark plugs to fail.
The spark plugs were changed, and air mixture screws set to 2 revolutuion from bottom. Bike run better, but not good. It still wanted to run on 1 cylinder. After some driving it got better.
After driving one hour at 100+ km/h the bike runns good on both cylinders. It idles nicely and has plenty of power.
After idling a minute or so or driving in slow trafic it starts running on 1 cylinder. When giving gas it starts running on both cylinders, and runs good with plenty of power. But maybe not as good as it run before the failiure.
My theory is that carbon buildup, possibly on the piston rings gives this effect.
My questions to the forum is.
What can be done to make it run good?
Is my theory about carbon deposit buildup plausible?
Has someone had similar problems when changing air filters/mufflers and/or rejetting the bike?
Have someone experienced spark plugs to fail? Should a different heat rating be chosen?
Have anyone used any carbon deposit remover? I have read about a product called seafoam, but I am a bit sceptical.
Or is the dissasembling and manual cleaning of pistons, valves and combustion chamber the correct way to do it.
Next thing I am planing to do is inspecting the spark plugs and then measuring the compression.
#136
TYREDNGRUMPEE
-

- Member
-
- 1,627 posts
has been here 4ever
- TDM model: 1998
Posted 28 July 2013 - 08:22 am
Did you remember to drop the needles back down 1 notch to their original position? This is the most likely cause of your rich fuel/air imbalance when engine braking on part throttle.
Your airflow and fuelling will always be high if you are using an aftermarket filter and have altered the airbox like that. So you should expect to run lean to some degree.
Maybe return to the successful setup as a compromise? It got you around Europe so it can't be that bad!
Setups like this usually employ a dynojet kit for the carbs, using oddball needle profiles to finely fuel around airflow.
Needle position is more to do with where you are on the face of the planet Earth and how much oxygen there is available for your engine to burn.
High altitude - top notch/drop needle
Normal - middle range
Low altitude - bottom notch/raise needle. You'd have to be tuned to the max and have a big bore kit to need this.
Edited by TYREDNGRUMPEE, 28 July 2013 - 08:32 am.
#137
anda3243
-
- Member
- 89 posts
really likes Carpe
- Location:Stockholm
- TDM model: 1999
Posted 31 July 2013 - 07:23 pm
Did you remember to drop the needles back down 1 notch to their original position? This is the most likely cause of your rich fuel/air imbalance when engine braking on part throttle.
Your airflow and fuelling will always be high if you are using an aftermarket filter and have altered the airbox like that. So you should expect to run lean to some degree.
Maybe return to the successful setup as a compromise? It got you around Europe so it can't be that bad!
Setups like this usually employ a dynojet kit for the carbs, using oddball needle profiles to finely fuel around airflow.
Needle position is more to do with where you are on the face of the planet Earth and how much oxygen there is available for your engine to burn.
High altitude - top notch/drop needle
Normal - middle range
Low altitude - bottom notch/raise needle. You'd have to be tuned to the max and have a big bore kit to need this.
I did not drop the needles. I only adjusted the idle screws. The bike is running much better with the needles in this higher position.
Now I have done another 500 km on mostly highway, and the problems with running rough are mostly gone. But I need to do more riding in city trafic to be sure.
I still have not had oportunity to measure compresion.
In Norway we were riding between sea level and 1000 and more meters above sea level. The bike was running good at both high and low altitudes.
The new needle position gave more power independent of the height above sea level.
I am thinking now that I need bigger main jets (155 or 160 instead of 150), and maybe drop the needles 1 or 2 notches.
One more thing that concerns me is that I have different markings on both needles. Should they be the same.
Right side needle marking: 6CLI
Left side needle marking: 6DJP
#138
TYREDNGRUMPEE
-
- Member
-
- 1,627 posts
has been here 4ever
- TDM model: 1998
Posted 01 August 2013 - 09:52 pm
- bottom notch/raise needle. You'd have to be tuned to the max and have a big bore kit to need this.
You are and do! I've been and read the entire thread again.
but then
I'd suggest two approaches.
- First, first and firstly, source an airbox that hasn't been modified. You may find out that the airbox inlet tract is more useful if it is left in place. It's a bit of an unknown factor at the moment. I've seen airboxes that have been modded on the dyno - with only one or two 10mm holes drilled through the tract into the filter centre. Then any surplus holes have been taped over with duct tape. Your airbox by comparison is wide open. I suspect it is a major factor in this story.
- Dropping/extending the needles is a no brainer. The 850 carbs sliders are being tested by the suck of the 900 pots. Your goal is to get the sliders working and the fuel/air mix correct through the entire rev range of the engine. Just change one aspect of the carbs at a time to get a feel for the effect. Dropping the needles doesn't cost anything. You know what you are doing here better than I do so I'll shut up now. You're most likely correct regards the jetting.
- Excellent project!
Edited by TYREDNGRUMPEE, 01 August 2013 - 10:06 pm.
#139
anda3243
-
- Member
- 89 posts
really likes Carpe
- Location:Stockholm
- TDM model: 1999
Posted 07 August 2013 - 09:13 pm
You are and do! I've been and read the entire thread again.
but then
I'd suggest two approaches.
- First, first and firstly, source an airbox that hasn't been modified. You may find out that the airbox inlet tract is more useful if it is left in place. It's a bit of an unknown factor at the moment. I've seen airboxes that have been modded on the dyno - with only one or two 10mm holes drilled through the tract into the filter centre. Then any surplus holes have been taped over with duct tape. Your airbox by comparison is wide open. I suspect it is a major factor in this story.
- Dropping/extending the needles is a no brainer. The 850 carbs sliders are being tested by the suck of the 900 pots. Your goal is to get the sliders working and the fuel/air mix correct through the entire rev range of the engine. Just change one aspect of the carbs at a time to get a feel for the effect. Dropping the needles doesn't cost anything. You know what you are doing here better than I do so I'll shut up now. You're most likely correct regards the jetting.
- Excellent project!
Good point, The airbox mod can be causing problems. I will try to find an used airbox lid with the snorkel intact. I have already ordered 155 and 160 size main jets, but I will try changing the airbox lid first.
Regarding the sliders. Last time I opened the carbs, I noticed that the sliders were worn. They have been pulled downwards by the suction and become worn. I did not check how much they had worn down, but it could maybe be causing problems.
Thank you!
#140
dapleb
-
- Root Admin(A)
-
- 18,387 posts
Monkey Boy
- Location:The home of morris dancin
- TDM model: 1990
Posted 07 August 2013 - 09:21 pm
Others have tried to mod the snookoo and it hasnt ended well.
"Whats up", "Piston Broke", "Yeah me too...hic"
If you want to mark your location on the Carpe map: http://www.carpe-tdm...opic.php?t=5117
Doin valve clearances? Use dappers valve shim exchange program and the job will be carroty - Free (other than you postin me yer shims) for sporting members.
Active member of TPLQHCSRSFC and TSRMCMAS (even though a year off) and avid fan of PM not sent.
1 user(s) are reading this topic
0 members, 1 guests, 0 anonymous users

